Quick answer To retwist locs, palm-roll or interlock only the new growth on clean, damp hair, following your existing parts, then dry them completely. Repeat every 2-3 weeks for starter locs at first, then about every 4 weeks; every 4-8 weeks for teen locs; and every 4-6 weeks once established.
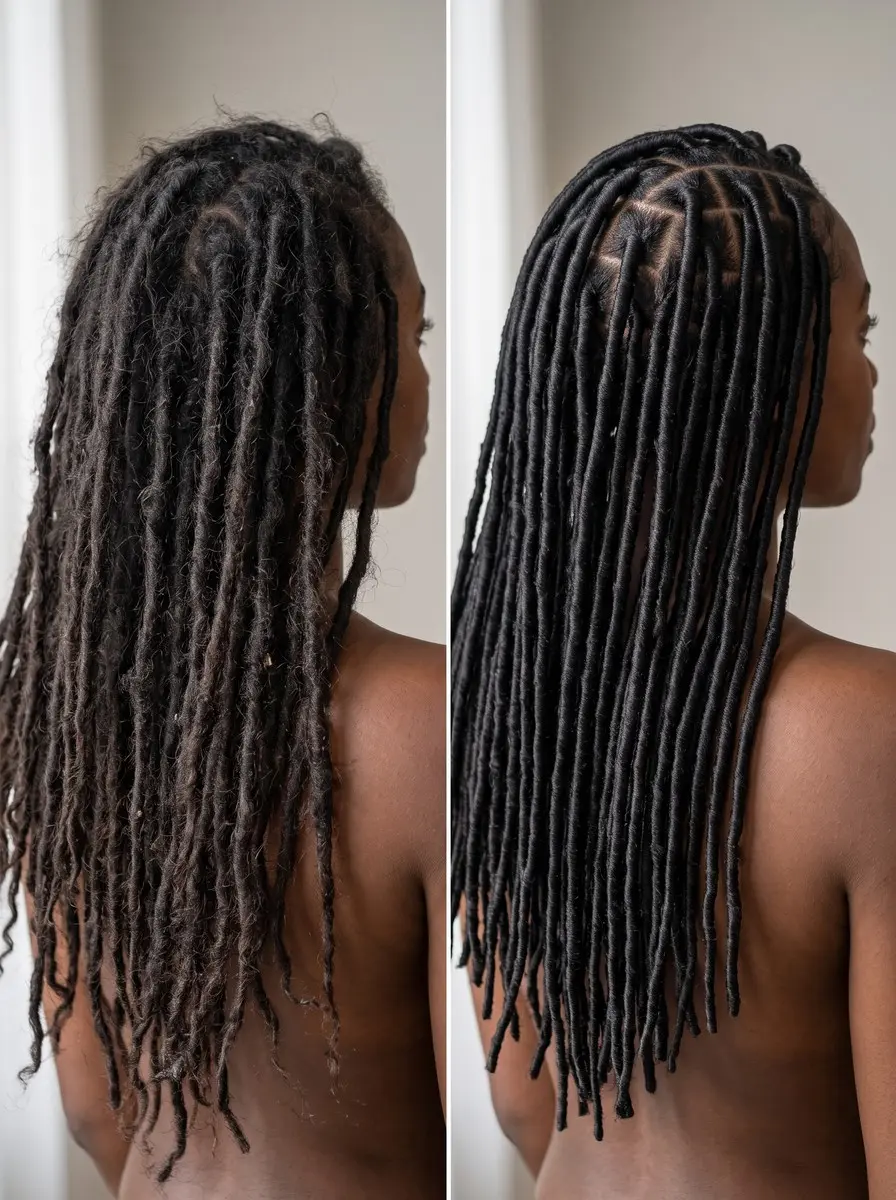
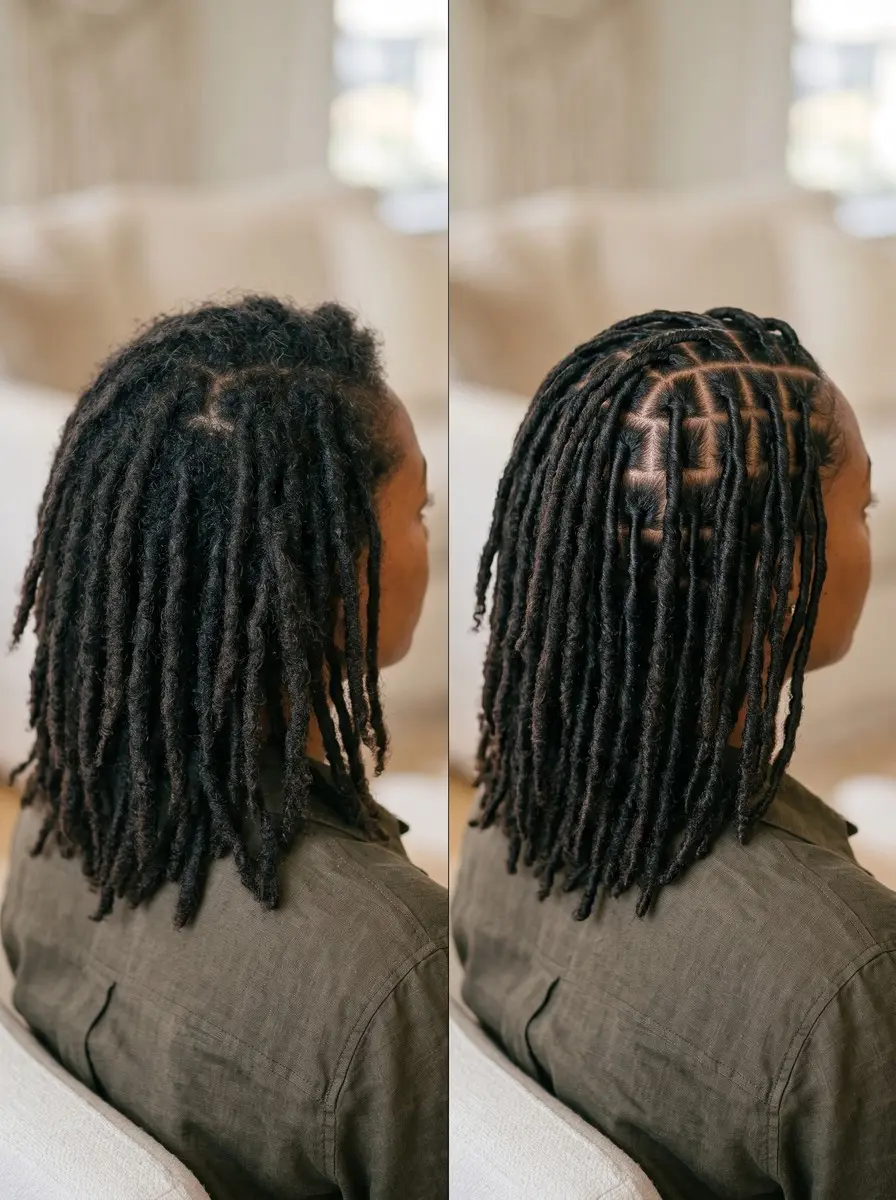
Fresh locs have a look you can spot across a room: crisp parts, smooth roots, every loc sitting in its own square. A few weeks later, new growth has blurred those lines into a soft halo of fuzz, and neighboring roots may be starting to knit together. A retwist is the routine that brings the shape back, and it’s the main upkeep chore of wearing locs.
Learning how to retwist locs at home is very doable once you know which method suits your hair, how often your loc stage actually needs it, and where the real risk sits: tension at the root.
Twist too tight or too often and you trade neat parts for soreness, thinning and broken roots. This guide puts timing and method choice first, then walks through prep, product, technique, drying and the scalp check that tells you whether you twisted too tight.
Time 2-4 hours, plus drying timeDifficulty IntermediateSteps 8
Retwist Interval by Loc Stage
| Loc stage | Retwist about every |
|---|---|
| Starter, first 4-6 weeks | 2-3 weeks |
| Starter, after that | 4 weeks |
| Teen | 4-8 weeks |
| Established (mature) | 4-6 weeks |
| Semi-freeform | Longer than 4-6 weeks |
What You’ll Need
As an Amazon Associate, HairAide earns from qualifying purchases. Product links in this guide are affiliate links: they cost you nothing extra and help keep these tutorials free.
- Residue-free clarifying shampoo Clears old product and lint off the roots so nothing gets twisted into the loc.
- Aloe-based locking gel Gives damp new growth just enough grip to hold a palm roll without the buildup that beeswax or heavy gels leave.
- Duckbill clips Hold each freshly palm-rolled root flat along its part while it dries.
- Loc interlocking tool Pulls the loc’s end through its new growth for an interlock retwist that holds through washing.
- Satin bonnet Cuts the overnight friction that frizzes fresh roots and keeps lint out of the locs.
Step-by-Step
Step 1 Confirm timing and pick a method
Retwist only when your locs are due, and that depends on their stage: every 2-3 weeks for starter locs in their first 4-6 weeks and about every 4 weeks after that, every 4-8 weeks for teen locs, about every 4-6 weeks once they’re established, and longer still for semi-freeform locs, because retwisting too often can thin and break the root while waiting too long lets locs mat together and lose their shape.
Then choose your method: palm rolling twists damp new growth between your palms with a little gel and is the gentlest option, giving smooth, cylindrical locs, but it loosens with washing, sweat and swimming, so it needs redoing more often than interlocking.
Interlocking pulls the loc’s end back through its own new growth with a latch-style tool, so it holds through washing and suits looser textures that won’t stay palm-rolled, though done too tight or too often it can leave the root thin or gappy.
A pipe-cleaner or rod set is a palm roll finished by wrapping each loc around a pipe cleaner or flexi-rod while it dries, giving you curls and a retwist in one session at the cost of a much longer dry.
You’re ready to start when new growth looks fuzzy at the parts or neighboring roots have started to grab each other, and you’ve committed to one method, since switching between palm rolling and interlocking from session to session leaves roots uneven.
Step 2 Start with clean, damp locs
Shampoo with a residue-free shampoo, squeeze the water out with a microfiber towel or cotton T-shirt, and let your locs air-dry until they’re damp rather than dripping.
Clean roots matter because whatever is on the hair when you twist, whether old product, oil or lint, gets locked inside the loc, where it can’t be rinsed out later.
Damp new growth is pliable enough to compact and grab without being forced, while soaking-wet locs are heavy, stretch the root under their own weight and take far longer to dry, which is how mildew smells start. You’re ready when the locs feel cool and slightly damp when squeezed and no water drips from the ends.
Step 3 Section along your existing parts
Divide your head into four to six large sections with clips and work one section at a time, following the parts your locs already have instead of carving new ones.
Each loc is anchored to its own patch of scalp, so moving a part drags hair from a neighbor into the wrong root and leaves one loc thicker and the next one thinner.
Before twisting, gently separate any roots that have started to merge by easing them apart at the base along the original part line, working slowly so you don’t snap the hairs that bridge them. Start with the interior sections at the back of the head, where mistakes are least visible, and save the perimeter for last.
Step 4 Use a light, wax-free product
Work a pea-size dab of light, aloe-based locking gel or loc cream into the new growth of one loc at a time, or skip product entirely if your hair holds a twist with water alone. Beeswax, petroleum and heavy, high-hold gels don’t rinse out of a loc’s dense core, so they build up into white residue, trap lint and make locs heavy and dull over time.
Using less product also means a faster, more thorough dry, which protects the core from mildew. You’ve used the right amount when the root feels tacky and controllable rather than wet, shiny or crunchy, and no white flakes show once it dries.
Step 5 Retwist only the new growth
For a palm roll, hold the loc taut but not tight, place the new growth between your palms close to the scalp, and roll in the same direction you’ve always used, working down until the new growth blends into the mature loc.
If you aren’t sure of your direction, roll one loc gently each way: the direction that tightens the root rather than loosening it is yours, and reversing it would unravel the previous retwist.
For interlocking, pass the loc’s end through the base of the new growth in a fixed rotation (front to back, back to front, left, right) so the root stays square, placing each pass right beside the last to avoid gaps that become weak spots.
Stop at the new growth plus about the first inch of mature loc, because twisting the full length adds friction and wear without locking anything new. You’re done when the root is smooth and snug and lies flat against the scalp with no skin lifting around it.
Step 6 Go easy on edges and thin locs
Save the perimeter locs along the hairline and nape, plus any thin or weak locs, for last, and give them about half the tension you used elsewhere. Perimeter hair is usually the finest on the head and takes the most strain from ponytails and updos, so it’s where traction damage shows first; you can also retwist these locs every other session instead of every time.
If a loc has narrowed at the root, palm-roll it lightly rather than interlocking it, and don’t pile on product to try to bulk it up.
A loc hanging by a few strands needs a repair, such as combining it with a neighbor or reinforcing the root, and that’s a job for a loctician, not a DIY fix. A retwist should feel snug and never painful, so if a root stings while you work, unroll it and redo it looser.
Step 7 Clip, dry and protect the set
Secure each palm-rolled root with a duckbill clip laid flat along the part (interlocked roots hold on their own), or tie a satin-lined scarf over the section where clips would dent, then let everything dry: air-drying can take most of a day, while a hooded dryer on low or medium shortens it.
Either way the core of each loc has to dry completely, because trapped moisture causes musty, mildew smells, and the cue is a loc that feels light and shows no cool, damp spot when you squeeze its thickest point.
For a pipe-cleaner or rod set, wrap the lengths below the root rather than at the scalp, and leave the rods in until the core feels bone-dry and a test curl holds its shape when you slide its rod out.
At night, sleep in a satin or silk bonnet or on a satin pillowcase to cut the friction that frizzes fresh roots. Give the retwist about a week before you shampoo, then focus the shampoo on your scalp and squeeze it through the lengths instead of scrubbing the roots.
Step 8 Check your scalp for tension
Over the next two or three days, check your scalp in a mirror and by touch for signs the retwist went too tight: tenderness that lasts beyond a day, small bumps around the roots, skin tenting around a loc, roots narrowing or hairs breaking at the base, or thinning along the edges.
These are traction signs, and repeated tension can lead to traction alopecia, which can become permanent if it goes on long enough, so catching them after every session matters more than any single retwist looking perfect.
If you find them, skip the affected locs next time, use a lighter grip and stretch your interval, and see a loctician or dermatologist if the thinning or root breakage continues. You’re done when your scalp feels comfortable to the touch within a day, every root lies flat with no skin lifting around it, and your edges look as full as they did before you started.
Common Mistakes to Avoid
- Twisting the root so tight that the scalp tents or feels sore, when a retwist should feel snug and never painful.
- Retwisting every week or two once locs are past the starter stage, which strains the root and can thin and break it.
- Using beeswax, petroleum or heavy gel that never rinses out of the loc’s core and builds up as white residue and trapped lint.
- Retwisting dripping-wet locs, or tying them up before the core is bone-dry, which invites mildew smells.
- Carving new parts or reversing your twist direction, which thins neighboring roots and unravels the previous retwist.
Pro tip Before you start, take a photo of your parting grid from above and behind and keep it by the mirror; matching it section by section is the easiest way to stop parts drifting over months of DIY retwists. If you see skin lifting around a root after you twist it, unroll it straight away and redo it at half the tension.
The Bottom Line
A good retwist leaves smooth, snug roots, crisp parts and a scalp that’s comfortable within a day. Maintain it with a satin bonnet at night, a light hand with product and a schedule matched to your loc stage, with 4-6 weeks the norm for established locs. If you dry under a hooded dryer, keep it on low or medium and mist a heat protectant over damp locs first.
DIY costs a jar of gel and an afternoon; salons usually price retwists by the number and length of your locs, so many small locs cost more than a few large ones. See a loctician if roots are thinning or breaking, starter locs keep unraveling or neighboring locs have merged; a pro retwist every few cycles also catches tension problems early.
Frequently Asked Questions
How often should you retwist locs?
It depends on your loc stage. Starter locs can be retwisted every 2-3 weeks in their first 4-6 weeks, then about every 4 weeks; teen-stage locs every 4-8 weeks; and established locs about every 4-6 weeks, StyleSeat's general rule of thumb. Semi-freeform locs go longer. Retwisting too often can cause thinning and breakage, while waiting too long lets locs mat together.
Can retwisting your locs too much cause thinning?
Yes. Frequent or tight retwisting puts repeated tension on the root, which can thin and break locs and, over time, lead to traction alopecia, a type of hair loss that can become permanent. Warning signs include soreness lasting more than a day, bumps around the roots, narrowing roots and thinning edges. Ease your tension, stretch the interval, and see a loctician or dermatologist if thinning continues.
Should locs be wet or dry when you retwist them?
Retwist clean, damp locs. Damp new growth is pliable and compacts without force, while dry hair resists the twist and soaking-wet locs are heavy, stretch the root and take much longer to dry. Squeeze out excess water with a microfiber towel until nothing drips, then work section by section, misting any root that has dried before you reach it.
Is palm rolling or interlocking better for retwisting locs?
Neither is better across the board. Palm rolling is gentler and gives smooth, cylindrical locs, but it loosens with washing and sweat, so it needs more frequent upkeep. Interlocking holds through washing and suits looser textures that won't stay palm-rolled, but too much tension can thin the root or leave gaps. Choose one method and stay with it for consistent roots.
How long should you wait to wash locs after a retwist?
Give a fresh retwist about a week before shampooing so the roots can settle, and wait longer for starter locs that still unravel easily. When you wash, focus the shampoo on your scalp, squeeze it through the lengths instead of scrubbing the roots, and dry every loc completely to the core to avoid mildew smells.
Keep Reading
Sources
- How often should you retwist locs styleseat.com