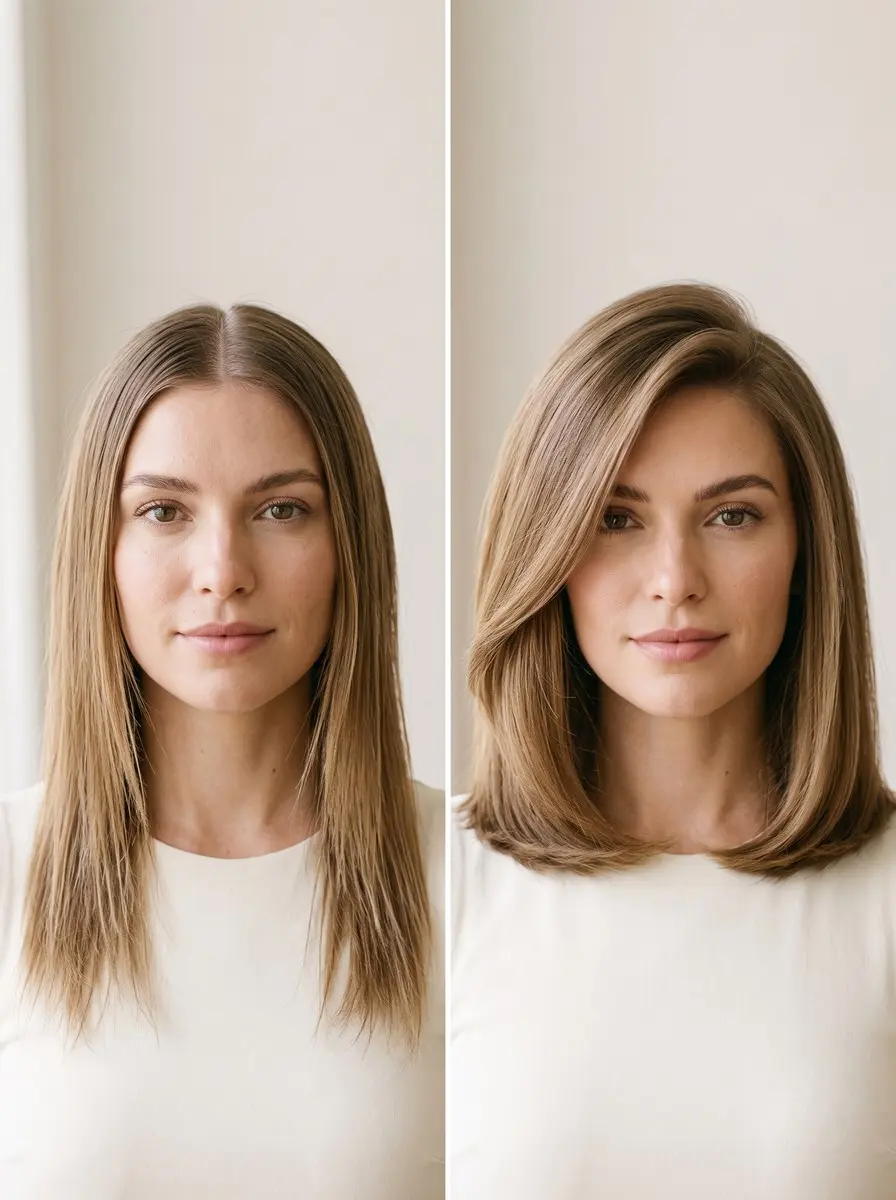
To make thin hair look thicker, wash with a volumizing shampoo, work root-lifting mousse into damp roots, blow-dry the roots up with a round brush, then add dry texturizing spray and light crown teasing. A blunt-ended cut and a side part boost the effect.
Thin or fine hair has a way of looking great for ten minutes before it collapses against your head, splits at the part to show scalp and tapers to wisps at the ends. The instinct is to pile on product, but most of what makes hair read as full is structure: where the weight sits, which direction the roots dry in and how much the strands grip one another.
This guide shows you how to make thin hair look thicker by putting the techniques stylists use into one routine you can follow from start to finish at home: cut, wash, mousse, part, blow-dry, texture, tease and finish. You won’t change how many hairs you have, but you can change how much space they take up, and no step needs more than a round brush, a comb and a few products.
What You’ll Need
- Lightweight volumizing shampoo (volumizing shampoo) — Clears oil and styling residue from the scalp without leaving a coating that weighs fine roots down.
- Root-lifting mousse (volumizing mousse) — Its flexible film holds the root in the lifted position you blow-dry it in and gives fine strands more grip.
- Medium round brush, 1.5-2 inch barrel (ceramic or boar-bristle round brush) — Gives you the grip and tension to lift and over-direct roots during the blow-dry without over-curling the ends.
- Dry texturizing spray or volumizing dry shampoo (texture spray) — Adds gritty grip at the roots so strands hold each other up instead of sliding flat.
- Fine-tooth teasing comb or boar-bristle teasing brush (teasing comb) — Lets you build a controlled cushion at the crown with short strokes instead of tangling the lengths.
As an Amazon Associate, HairAide earns from qualifying purchases. Some links above are affiliate links — they cost you nothing extra and help support free tutorials.
Step-by-Step
-
Start with a cut that puts the weight at your ends. Ask your stylist for a blunt perimeter, meaning one clean baseline with few or no long layers, and go to bob or lob length if you’re open to going shorter. Hair naturally thins toward the ends because strands sit at different lengths and the oldest sections are the most worn. A blunt cut brings every end to the same line and creates a dense edge that reads as thick. Long layers do the opposite: they carve weight out of the perimeter so the ends look see-through, and extra length adds weight that drags the roots flat. Book a trim every 6-8 weeks, because the blunt line softens and loses its shape as it grows out.
-
Shampoo with a lightweight volumizing formula and focus your fingertips on the scalp, where oil and styling residue collect and glue fine strands together. Apply conditioner from the mid-lengths to the ends only. Fine hair still needs detangling, but conditioner at the root coats it and flattens it before you’ve started styling. Rinse thoroughly, since leftover conditioner is one of the most common reasons roots go limp by midday. Blot with a microfiber towel or cotton T-shirt until hair is damp rather than dripping, because styling products dilute and slide off soaking-wet hair.
-
Shake a can of root-lifting mousse and dispense a golf-ball-sized amount into your palm (half that for short hair). Work it into the first 2-3 inches from the scalp, section by section, rather than smoothing it over the top. Mousse leaves a light, flexible film on each strand that firms as it dries. That film holds the root in whatever position you dry it in and gives slippery fine hair more grip and body. Run a wide-tooth comb through the roots to spread it evenly, since clumps of product dry stiff and flaky. Keep it off the ends: they don’t need hold, and mousse only makes them look heavier and stringier.
-
While hair is still damp, use the tail of a comb to move your part an inch or two off center, or flip it to the opposite side from where you usually wear it. A side part stacks more hair on one side and makes the roots along the part stand up against the direction they’re used to falling. That gives you more visual fullness than a center part, where hair splits evenly, lies flat on both sides and shows the most scalp. If your part tends to look wide, zigzag it with the comb tail so the scalp shows as a broken line instead of a straight stripe. Set the part now, before drying, because roots hold the direction they dry in.
-
Before you pick up the dryer, mist a heat protectant over your damp hair, concentrating on the mid-lengths and ends, which are the oldest and most fragile part of each strand. Set the dryer to medium heat. Start at the crown. Lift a section about as wide as your brush straight up from the scalp with a medium round brush, and aim the dryer (nozzle attached) down the section from the root toward the mid-lengths. Keep the dryer moving so no single spot takes concentrated heat. Drying the root against its natural fall, which stylists call over-directing, sets it standing up instead of lying flat, and that root angle is where most visible fullness comes from. Let each section cool on the brush for a few seconds, or press the cool-shot button, before you release it. Hair locks in its new shape as it cools, not while it’s hot. Work forward to the hairline, then rough-dry the lengths with your fingers. This step alone gives real lift, so it also works on days you skip the mousse.
-
Once hair is completely dry and cool, lift sections at the crown and along the part. Mist a dry texturizing spray or a volumizing dry shampoo directly at the roots from about 6 inches away. The fine powders and starches in these sprays give each strand a slightly gritty finish, so strands catch on one another instead of sliding flat and the whole mass takes up more space. Wait 30 seconds, then massage the roots with your fingertips to spread the product and push in extra lift. On clean hair, dry shampoo works as a texture tool as well as a second-day fix.
-
Take a 1-2 inch section at the crown and hold it straight up and taut. With a fine-tooth teasing comb or a narrow boar-bristle brush, push the hair down toward the scalp in two or three short strokes, staying within the bottom couple of inches. Those short backcombing strokes build a small cushion at the base that props the section up, so the crown looks higher and denser. Long strokes dragged through the lengths are what create knots and snap fine hair. Repeat on three to five sections from the crown toward your hairline and leave the very top layer untouched. Lay that top layer over the teased base and smooth it lightly with the brush so the finish looks full rather than backcombed.
-
Mist a flexible-hold hairspray from about 10 inches away, concentrating on the crown and the part, so the lift holds without turning stiff or crunchy. If your ends need smoothing, warm a pea-size drop of lightweight oil or serum between your palms and touch it to the last inch or two only. Heavy oils and serums anywhere near the root undo every step above. Check your side profile in a mirror. If the crown has dropped, lift it at the root with your fingertips and give it one more short burst of spray. Through the day, keep your hands out of your hair, because touching moves oil to the roots and flattens them.
Common Mistakes to Avoid
- Conditioning from the roots down, which coats fine hair at the scalp and flattens it before you start styling.
- Putting mousse or texture spray on the lengths and ends instead of the roots, which adds weight exactly where you want less.
- Letting the roots air-dry flat before you pick up the dryer. Once the root sets against your head, you can’t get the lift back without re-wetting it.
- Backcombing with long strokes through the whole section, then brushing it out dry, which knots and breaks fine strands.
- Asking for a long, heavily layered cut that strips weight from the ends and leaves them see-through.
Pro Tip
For crown height that lasts until evening, set the top section in two or three large Velcro rollers right after the blow-dry and leave them in while you do your makeup. Hair sets its shape as it cools, and the rollers hold the lift in place while that happens.
Frequently Asked Questions
Does cutting thin hair make it grow back thicker?
No. A haircut doesn't change how many hairs grow from your scalp, how thick each strand is, or how fast hair grows, which stays at roughly half an inch a month. A trim removes the sparse, worn ends so the hemline looks denser. That's why a blunt trim every 6-8 weeks keeps thin hair looking fuller.
Is teasing bad for thin or fine hair?
Gentle teasing is fine for regular styling if you use short strokes in 1-2 inch sections at the root only and never drag the comb through the lengths. Most damage comes from long strokes and from brushing teased hair out while it's dry. To remove it, detangle from the ends upward with conditioner in the shower, and skip teasing on days your hair feels fragile.
Is a side part or a center part better for thin hair?
A side part creates more visual fullness than a center part. It stacks more hair on one side and makes the roots along the part lift against their usual direction. A center part splits hair evenly, so it lies flat and shows more scalp. Flipping your part to the opposite side from where you usually wear it adds even more root lift.
Can I make thin hair look thicker without heat?
Yes. Apply mousse to damp roots, set a side part, then clip the crown roots up with flat duckbill clips and let your hair air-dry so the roots set lifted. Finish with dry texturizing spray and light teasing at the crown, and neither uses heat. Soft heatless waves add width too, since bent hair takes up more space than straight hair.
How long does the extra volume last?
On fine hair, a mousse-and-round-brush blow-dry usually holds for a day or two, until scalp oil starts to weigh the roots down. On the second day, mist dry shampoo or texture spray at the roots, massage it in and lightly re-tease the crown. When the roots still look flat or feel coated after that, wash and start the routine again.
You Might Also Like
- 20 lob haircuts for women over 40 to inspire your next look
- 20 long pixie bob ideas to inspire your next cut
- how to get heatless curls overnight
- textured fringe hairstyles that add shape and movement
- how to do a root touch-up at home
- long pixie bob with bangs ideas
Together, these steps change how much space your hair takes up. The blunt cut gives the ends density, mousse and a round-brush blow-dry lift the roots, and dry texture plus light teasing hold them up. Repeat the routine each wash day, refresh second-day roots with dry shampoo, and book a trim every 6-8 weeks to keep the line crisp.
Styling can disguise thin hair, but it can’t treat hair loss. If you notice a widening part, more shedding than usual or patchy thinning, see a dermatologist. They can look for causes such as hormonal changes, iron deficiency or thyroid issues and discuss treatment.
Sources
- Teasing the crown in 1-2 inch sections with short backcombing strokes is a classic technique for creating the illusion of thicker roots. batistehair.com
- A side part creates more visual fullness than a center part. aarp.org