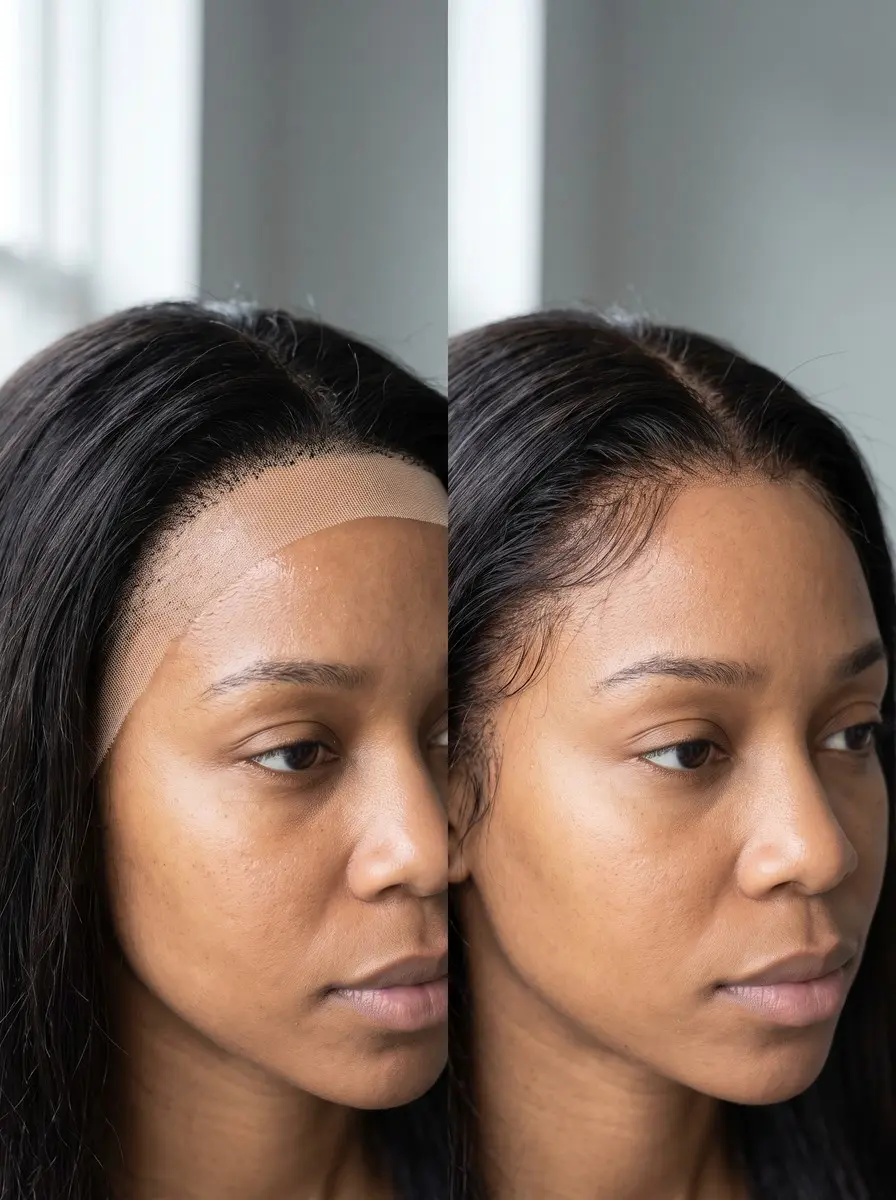
Quick answer To customize a lace front wig, pin it to a mannequin head, test and then bleach the knots, set the part, and pluck a few hairs at a time along the part and hairline. Finish by tinting the lace, trimming it with a small margin and shaping baby hairs.
Learning to customize a lace front wig is what turns a box-fresh unit into something that looks like your own hairline. Straight out of the box, most lace fronts look like a wig. The hairline is dense and runs straight across, the part sits in a tight line of dark dots, and the lace is a shade that matches nobody’s skin.
When you customize a lace front wig, you fix all three. You thin the hairline so it feathers the way real hair does, lighten the knots so the part looks like scalp, and tint the lace so it disappears.
You can do all of it at home with tweezers, a mannequin head and some patience, but every step has a way to go wrong. Over-plucking leaves bald patches, bleach can loosen knots and burn the lace, and you can’t undo a lace cut.
This guide does the steps in a safe order, tests anything chemical before it touches the whole unit, and names the risk of each step before you start. If this is your first time, practice on a cheap spare wig before you work on the one you paid real money for.
Time 2-3 hours, plus air-drying timeDifficulty IntermediateSteps 9
What You Can Do to Each Wig Type
| Customization | Human-hair lace front | Standard synthetic lace front |
|---|---|---|
| Plucking | Yes, a few hairs at a time | Yes, extra gently |
| Bleaching knots | Yes, after a test, with 20 volume | No |
| Lace tint or concealer | Yes | Yes |
| Cutting lace and baby hairs | Yes | Yes |
| Hot tools | Yes, with a heat protectant | Only if labeled heat-friendly |
What You’ll Need
As an Amazon Associate, HairAide earns from qualifying purchases. Product links in this guide are affiliate links: they cost you nothing extra and help keep these tutorials free.
- Slant-tip tweezers A fine slant tip grips two or three hairs at a time, so you pluck gradually and don’t pull out a clump.
- Canvas block mannequin head with T-pins Holds the lace flat and at eye level, so you can pluck, bleach and trim evenly.
- Powder lightener and 20 volume developer A mild developer mixed into a thick paste lifts the knots slowly enough to control.
- Lace tint spray Tints the lace in light, buildable layers so it blends into your skin.
- Edge control and edge brush Lays the baby hairs flat in soft swoops after the install.
Step-by-Step
Step 1 Secure the wig on a mannequin head
Put the wig on a canvas block head that’s roughly your head size, line up the lace with where your own hairline would sit, and push T-pins through the ear tabs and the back of the cap.
Working on a fixed head instead of in your lap keeps the lace flat and lets you see the hairline at eye level, which is how other people will see it. Comb the front hair straight back so the whole lace is in view.
The wig is ready when it doesn’t shift when you tug the front gently. If this is your first customization, do these steps on a spare or inexpensive wig first, since plucking and cutting are permanent.
Step 2 Test bleach on a few knots
Before you bleach the whole lace, mix a small amount of powder lightener with 20 volume developer and dab it on a few knots at the back edge of the lace or behind an ear tab, where a mistake won’t show. Check every few minutes, then rinse and look at both the knots and the hair coming out of them.
The test tells you how fast this particular unit lifts, whether the lace discolors or weakens, and whether hairs shed when you run a finger over the area. A good result is knots that have gone from black to light brown, with no hairs slipping out.
Step 3 Bleach the knots across the lace
Turn the front of the wig inside out so the underside of the lace faces you, then brush a thick paste of lightener and 20 volume developer over the lace with an applicator brush, working only where there are knots.
The paste has to be thick so it sits on the knots and doesn’t seep through to the hair on the other side, which would leave blonde roots. Keep it off the cap and the elastic, and don’t press it into the lace.
Use the timing from your test, check often, and rinse thoroughly as soon as the knots look light brown, then wash with a sulfate-free shampoo and conditioner. Leaving it on until they look blonde loosens the knots and makes the wig shed.
Step 4 Set your part first
Once the wig has air-dried completely on the mannequin, comb the hair into the part you’ll actually wear, whether middle, side or deep side, and pin it flat. Do this before you pluck, because the part decides where you pluck and later where you cut baby hairs.
If you pluck first, you can end up thinning a section that ends up hidden while the part you wear stays dense and wiggy. The part is set when it lies flat on its own and the lace on either side of it is clearly visible.
Step 5 Pluck along the part
With slant tweezers, pull out two or three hairs at a time from the edges of the part line, tugging in the direction the hair lies so the knots don’t tear the lace. Pluck unevenly, a few here and a few slightly further back, so the part widens into a soft, irregular line instead of a ruler-straight one.
Real parts aren’t perfectly even, and the irregular density is what makes the lace look like scalp. Every few minutes, step back and look from arm’s length in daylight. You’re done when the part looks like skin showing through hair, not a bald stripe.
Step 6 Thin the hairline in small sections
Work across the front hairline one small section at a time, plucking a few hairs from just behind the very front row so the density fades from sparse at the edge to full further back. Move along the hairline in a zigzag rather than a straight line, and keep coming back to compare left and right.
A natural hairline is soft and slightly uneven, not a solid line of hair. Stop before it looks right up close, because over-plucking one spot leaves a bald patch you can’t fill, and heavy plucking weakens the lace. The hairline is finished when it feathers gradually from arm’s length.
Step 7 Tint the lace to your skin
Test the lace tint first on the outer strip of lace you’ll trim away, let it dry, and hold it against your forehead in daylight to check the shade. Then spray or dab the tint onto the underside of the lace from a short distance in light layers, letting each one dry, until the lace matches your skin.
For a quick fix or touch-ups along the part, use a little concealer or foundation in your shade on the underside of the lace instead. Several thin layers look natural, while one heavy coat leaves a dark band at the hairline.
Step 8 Trim the lace with a margin
With small, sharp scissors, rough-trim the excess lace along the front, staying well ahead of the hairline so a strip of lace remains for you to hold and press down during the install. Do the final close cut when the wig is on your head, cutting in small zigzag snips so the edge doesn’t form a straight line that catches the light.
A margin protects the knots at the very front, and a jagged edge blends into skin far better than a clean line. Cutting is permanent, so take off less than you think you need. You can always trim more.
Step 9 Cut and shape baby hairs
Section off a very thin strip of hair along the front hairline, only a few hairs deep and following the part you set, and clip the rest back. Snip that strip to varied short lengths, so not every hair is the same size, which keeps the edges from looking like a fringe.
Once the wig is installed, lay them with a little edge control and a soft edge brush into gentle swoops. Keep the strip thin, since baby hairs cut from too deep a section leave a short, choppy hairline.
Common Mistakes to Avoid
- Plucking one spot until it looks right up close, which leaves a bald patch once you step back. Check from arm’s length every few minutes.
- Bleaching with a high-volume developer or leaving it on until the knots look blonde. This loosens the knots and makes the wig shed at the hairline.
- Using a runny bleach mix that seeps through the lace and leaves blonde roots, or letting it touch the cap and burn the lace.
- Plucking before setting the part, which thins a section you’ll never wear and leaves the visible part dense.
- Cutting the lace right up to the hairline before the install. No margin is left to hold, and the front knots are exposed.
Pro tip Look at your hairline in daylight from arm’s length, never under a bright lamp with your nose to the lace. Up close every hairline looks too dense, and that’s exactly how people over-pluck.
The Bottom Line
Customized properly, a lace front stops reading as a wig. The hairline feathers, the part looks like scalp, and the lace disappears into your skin. The order is what keeps it safe: test before you bleach, set the part before you pluck, and leave a margin before you cut.
Plucking and bleached knots last for the life of the wig, while lace tint needs a refresh after washes and baby hairs need relaying each time you install the wig.
If the wig was expensive, is a full frontal, or the test patch shed hairs or discolored the lace, stop and take it to a stylist who customizes wigs. A pro can still save a unit that’s only half done, but nobody can put plucked hair back.
Frequently Asked Questions
How much should I pluck a lace front wig?
Less than you think. Pluck two or three hairs at a time along the part and the front hairline, stopping when the density fades softly from the edge backward when you look from arm's length. Over-plucking leaves bald patches and weakens the lace, and plucked hair can't be put back, so it's safer to stop early and add a little more later.
Can you bleach the knots on a synthetic lace front wig?
No. Bleach doesn't lighten synthetic fiber the way it lightens human hair, and it can damage both the fiber and the lace. On a synthetic unit, hide the knots with lace tint, or dab a little concealer or foundation on the underside of the lace along the part. You can still pluck it, but go extra gently.
Can I use heat on my wig after customizing it?
Standard synthetic fiber melts under hot tools, so use heat only on wigs labeled heat-friendly, and stay within the label's limit. On human-hair units, use a heat protectant first. Irons go on completely dry hair only. Keep them around 150°C/300°F for fine or bleached hair, which includes freshly bleached knots, and 180-200°C/355-390°F for coarse hair.
How long does lace tint last?
Lace tint is temporary and fades a little with every wash, so plan to re-tint the lace after washing or every few washes, depending on the product. Concealer or foundation on the lace comes off sooner and is best for touch-ups. Plucking and bleached knots are permanent and don't need redoing.
Should I have a stylist customize my wig instead?
Consider a stylist for an expensive unit, a full frontal, or your very first customization if you don't have a spare wig to practice on. Plucking, bleaching and cutting can't be undone, and a stylist who customizes wigs regularly knows how fast knots lift. Lace tinting and laying baby hairs are easy to do yourself afterward.
Keep Reading
Sources
- How to create baby hair edges shop.mayvenn.com
- How to create baby hair edges shop.mayvenn.com
- Wig customization securityheader.myzeepay.com