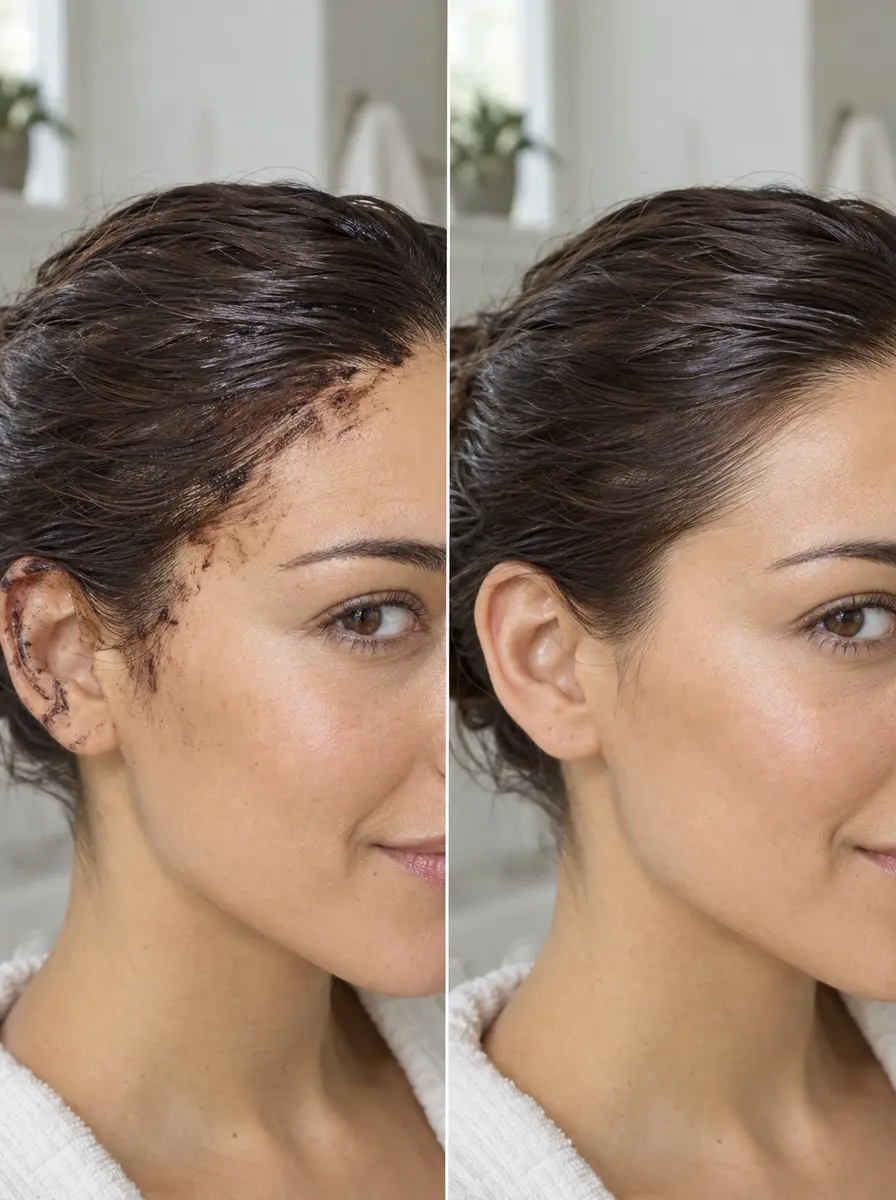
Quick answer To remove hair dye stains from skin, wipe fresh drips with a damp cotton round right away, then massage in a cleansing oil and follow with micellar water or a gentle cleanser. For set stains, use a mild baking soda paste, then save a skin-safe stain remover for last.
You did the hard part. The color went on evenly, and then you catch it in the mirror: a brown line along your hairline, a smudge on your ear, a tinted rim around every fingernail. Staining is one of the most common side effects of coloring at home, and it shows up most with dark and vivid shades, which carry the most pigment.
The good news is that dye on skin sits in the outermost layer of dead cells, so gentle methods take it off and whatever is left fades on its own within days.
Here is how to remove hair dye stains from your skin, hairline and nails without harsh scrubbing, working up from the gentlest wipe to the strongest skin-safe option with a patch test and a stop rule at every rung. You’ll also find the two minutes of prep that stop stains forming in the first place.
Time 5-20 minutesDifficulty BeginnerSteps 7
Hair Dye Stain Removers, Gentlest to Strongest
| Method | Safe to use on | Stop if |
|---|---|---|
| Cleansing oil or balm | Any skin, near the eyes too (keep it out of them) | No change after two rounds |
| Micellar water or gentle cleanser | Any skin; only micellar water near the eyes | Skin feels tight or stings |
| Baking soda paste | Hairline, ears, neck, hands, nails | Any pinkness, or after 30 seconds |
| Skin-safe stain remover | Small spots on unbroken skin, away from the eyes | Any stinging or burning |
What You’ll Need
As an Amazon Associate, HairAide earns from qualifying purchases. Product links in this guide are affiliate links: they cost you nothing extra and help keep these tutorials free.
- Petroleum jelly or barrier balm Blocks dye from reaching the skin along the hairline, ears and neck, and doubles as an overnight stain lifter and a soothing finish.
- Disposable nitrile gloves Keeps dye off your hands and nails, which is far easier than scrubbing cuticle stains afterwards.
- Cotton rounds Used damp to wipe drips in the first few minutes, and to apply and wipe away every remover in the ladder.
- Cleansing oil or cleansing balm The gentlest first rung: it breaks down the dye base and loosens surface pigment without scrubbing.
- Micellar water or a gentle fragrance-free cleanser Its surfactants carry away the loosened pigment and leftover oil, and the cleanser also makes the warm-water nail soak.
- Baking soda Mixed with water into a soft paste, it buffs away the dead skin cells where set stains sit on the body and around the nails.
- Skin-safe hair color stain remover Optional: the last-resort step for small, stubborn spots on unbroken skin, away from the eyes.
- Soft nail brush Optional: needed only if dye reached your nails, to work baking soda paste into stained cuticles after a soak.
Step-by-Step
Step 1 Lay down a barrier before dyeing
With clean, bare hands, smooth a thin layer of petroleum jelly or barrier balm along your hairline, over the tops and backs of your ears and down the nape of your neck. Keep it on the skin and off the hair.
The film sits between your skin and the dye, so drips land on the barrier and wipe away with it instead of soaking in.
Do this before you pull on disposable gloves and mix the color, because jelly smeared onto gloves ends up on your hair and can stop the baby hairs at the hairline from taking color. You’re ready when the skin looks slightly glossy all the way around.
Step 2 Wipe drips within minutes
Keep a stack of damp cotton rounds beside you while you apply color, and wipe any smudge on your forehead, ears or neck as soon as you notice it. Permanent dye darkens as it oxidizes, and it lifts far more easily in the first few minutes than after it has processed for half an hour.
Use one light pass rather than rubbing, which only spreads the dye into a wider smear. If a mark still shows after one pass, leave it alone for now and deal with it after you rinse your hair.
Step 3 Patch test, then start with oil
Before any remover touches a stain, dab a little of each one you plan to use on your inner forearm and wait 10-15 minutes, checking for redness, itching or stinging; skin that has just been in contact with hair color can already be slightly irritated, so ideally test the whole kit a day or two before you color.
The stop rule is the same for every rung from here on: any stinging, burning or new redness means you wipe the product off, rinse with cool water and go no further up the ladder.
Once the test passes, massage a cleansing oil or balm into the stain with your fingertips for about a minute, leave it for five minutes, then wipe it away with a cotton round. Oil breaks down the creamy dye base and loosens pigment sitting on the skin’s surface, which makes it the gentlest first rung, and it’s gentle enough to use near the eyes as long as you keep it out of them.
On a set stain it may only fade the mark, so repeat once if it’s fading and move on if two rounds barely change it; for a stubborn spot you’d rather not scrub, smooth on petroleum jelly at bedtime and wipe it off in the morning.
Step 4 Lift residue with micellar water
Soak a cotton round in micellar water, or in a gentle fragrance-free cleanser worked into a lather with a little water, press it on the stain for 20 seconds, then wipe in one direction rather than back and forth.
Surfactant molecules hold onto oil at one end and water at the other, so they carry away the loosened pigment along with the oil left from the step before. Micellar water is gentle enough near the eyes; keep lathered cleanser away from them.
Rinse with plain water and pat dry. Stop if the skin feels tight or starts to sting. If the stain is lighter but still visible, it has probably set into the top layer of skin and needs the next step.
Step 5 Buff set stains with baking soda
Mix a teaspoon of baking soda with a few drops of water into a soft paste, rub it over the stain in small, light circles for no more than 30 seconds, then rinse well.
A stain that survives oil and cleanser has settled into the outermost layer of dead skin cells, and a mild exfoliant removes some of those cells and the pigment with them. Use it only on the hairline, ears, neck, hands and nails.
Never use it on the eyelids, near the eyes, or on broken, sunburned or irritated skin. Stop at the first sign of pinkness. Once a day is plenty, because by the next day your skin will have shed a little more of the stain on its own.
Step 6 Finish with remover, then let skin rest
If a mark is still obvious after the gentler rungs, dab on a skin-safe hair color stain remover, the kind salons keep at the color station, leave it on only as long as the label says, then wipe it off and rinse the skin with water.
These formulas are made to lift dye from skin but are stronger than oil or soap, so keep them to small spots on unbroken skin well away from the eyes, and never swap in nail polish remover, acetone, undiluted household bleach or leftover developer, which can burn or badly dry the skin.
Whichever rung you stop on, rinse the area, pat it dry and smooth on a thin layer of petroleum jelly to calm skin that has been cleansed and buffed.
Any faint shadow left sits in skin cells your body sheds naturally, so it usually fades over the next few days, while going back to the removers every few hours only irritates the skin and can leave a red patch that shows more than the stain did. If the mark hasn’t faded after about a week, or the skin is itchy, swollen, blistering or burning, stop using every remover and see a dermatologist.
Step 7 Treat nails and scalp differently
For stained nails and cuticles, soak your fingertips for five minutes in warm water with a squeeze of gentle cleanser, then scrub around the cuticles with a soft nail brush dipped in baking soda paste.
Dye clings to the rough skin of the cuticles and soaks into the surface of the nail, so the soak softens everything before you scrub. Any tint left inside the nail itself grows out with the nail.
The scalp needs a different approach: skip baking soda and stain remover there entirely. A tint along your part usually fades within a few washes, and massaging in a little cleansing oil before your next wash speeds that up.
Common Mistakes to Avoid
- Scrubbing a fresh stain hard, which spreads the dye into a wider smear and irritates skin that has already been in contact with color
- Reaching for nail polish remover, acetone, undiluted household bleach or leftover developer, which can burn or dry the skin and are never safe near the eyes
- Spreading petroleum jelly onto the hair at the hairline, which can stop those front hairs from taking color
- Leaving drips until after you rinse, which gives the dye a full processing time to darken on your skin
- Using baking soda paste or stain remover near the eyes, on the scalp or on skin that’s already red or broken
Pro tip At rinse time, add a splash of warm water and massage the color along your hairline for 30 seconds before you rinse. Colorists call this emulsifying: it loosens dye from the skin, so much of the stain goes down the drain with the color.
The Bottom Line
A fresh drip wiped within minutes rarely leaves a mark, and most set stains clear with cleansing oil, micellar water and, at most, a gentle baking soda buff. Any faint shadow left fades over a few days as your skin sheds.
Next time you color, put on the barrier and gloves first and keep damp cotton rounds within reach. That prep takes two minutes and usually means you won’t need any of these removal steps.
See a dermatologist if a stain hasn’t faded after about a week, or if the skin turns red, itchy, swollen or blistered, which can mean a reaction to the dye rather than just a stain. Swelling around the face or eyes, or any trouble breathing, needs urgent medical care. Before your next color, do the skin allergy test your dye’s instructions call for.
Frequently Asked Questions
How long do hair dye stains last on skin?
Most hair dye stains on skin fade on their own within a few days, because the pigment sits in the outer layer of dead skin cells that your body sheds all the time. Cleansing oil and a gentle cleanser speed that up. Dark and vivid shades can linger a little longer. If a mark hasn't faded after about a week, or the skin is irritated, see a dermatologist.
Can I use nail polish remover or bleach to get hair dye off my skin?
No. Acetone, nail polish remover and undiluted household bleach are harsh chemicals that can dry, burn or irritate skin, and they're dangerous anywhere near the eyes. Leftover hair color developer doesn't belong on skin either. Work up from cleansing oil and micellar water to a mild baking soda paste, and use only a stain remover that is labeled safe for skin.
What's safe to use on hair dye near my eyes?
Near the eyes, use only a cleansing oil or micellar water on a cotton round, wiped gently in one direction, and keep both out of the eye itself. Skip baking soda, stain remover and anything abrasive there. If dye gets into your eye, flush it with lukewarm running water for several minutes and get medical advice.
How do I get hair dye off my nails and cuticles?
Soak your fingertips in warm water with a little gentle cleanser for five minutes, then scrub the cuticles with a soft nail brush dipped in baking soda paste. Repeat once a day instead of scrubbing harder. Any tint that has soaked into the nail itself won't scrub out; it grows out with the nail. Wearing gloves from your first squeeze of color prevents it.
Why do dark and bright hair colors stain skin more?
Dark permanent shades and vivid semi-permanent colors carry more pigment, so even a small smudge leaves a visible mark. Vivid semi-permanents are also direct dyes: they stain anything porous on contact, from skin and nails to grout and towels, without needing developer. With these shades, the barrier, the gloves and wiping drips immediately matter most.
Keep Reading
Sources
- How to remove hair dye from skin mindbodygreen.com
- Remove hair dye from skin purewow.com
- How to take off hair dye from skin purespadirect.com