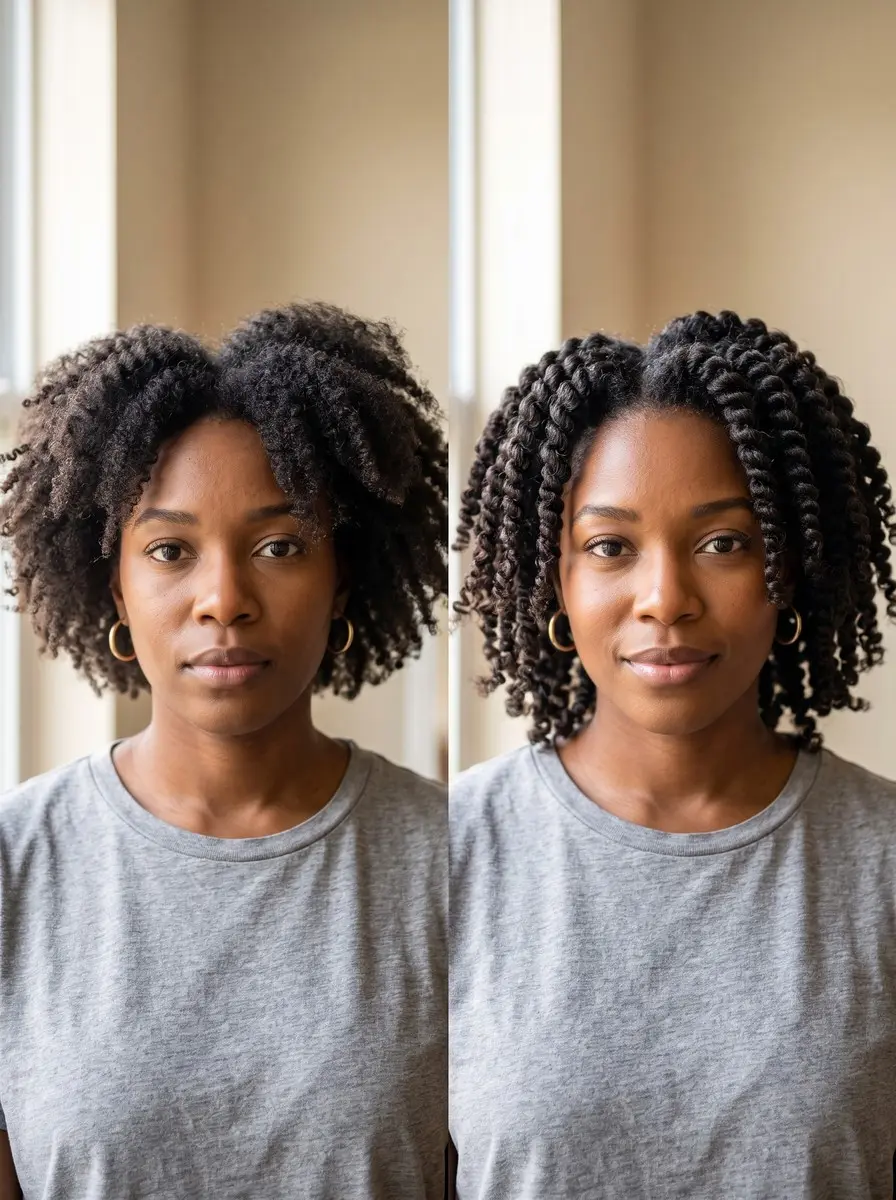
To do a twist out, apply a leave-in, an oil and a defining cream to clean, damp, detangled hair. Two-strand twist it in 1-inch sections from root to end and let the twists dry completely. Then unravel each one from the ends with oiled fingers and lift only the roots with a pick.
Freshly washed natural hair can shrink to a fraction of its length and dry into undefined, fuzzy texture. A twist out fixes exactly that. You set damp hair in two-strand twists, let them dry into shape, then unravel them into stretched, defined clumps that show off your length. You don’t need a salon appointment or any styling tool beyond a comb and a pick.
The technique is simple, but small details decide whether you get crisp definition or a frizzy puff. They are how evenly you split each twist, how much product you use, and whether the twists are truly dry before you touch them. This guide explains why each step matters and how to adjust it for fine, low-density hair and for coarse, dense hair. It also covers frizz, puffy roots and twists that unravel, and how to keep the style going from day two to day five.
What You’ll Need
- Leave-in conditioner for curly and coily hair — Gives damp hair the slip and hydration it needs before twisting, so strands clump instead of fuzzing.
- Twisting cream or curl-defining gel — Clumps each strand and gives the twist the hold that becomes your definition.
- Lightweight hair oil (jojoba or argan) — Layered over the leave-in to slow moisture loss, and used on your fingertips so twists unravel without frizz.
- Wide-tooth afro pick — Lifts the roots for fullness without dragging through the lengths and breaking up defined clumps.
- Satin bonnet or silk scarf — Cuts overnight friction and moisture loss, so the twist out stays defined from day two to day five.
As an Amazon Associate, HairAide earns from qualifying purchases. Some links above are affiliate links — they cost you nothing extra and help support free tutorials.
Step-by-Step
-
Start wash day by shampooing or co-washing to remove buildup, then apply a rinse-out or deep conditioner. While it’s still in, detangle with your fingers or a wide-tooth comb, working from the ends up to the roots. A twist out sets whatever is already in your hair, so knots, shed hairs and leftover product get locked into the twists and show up later as fuzz and uneven clumps. Working from the ends first stops you pushing small knots down into a tighter tangle. Rinse, blot with a microfiber towel or cotton T-shirt instead of rubbing, and move on once your fingers glide from root to tip without snagging and the hair is damp but not dripping.
-
Part your damp hair into four large sections and clip three out of the way, then work a leave-in conditioner through the first section from root to tip. Sectioning before you apply product means every strand gets an even coat, instead of the crown getting most of it and the nape almost none. Keep a spray bottle of water nearby. Twisting on slightly wetter hair takes longer to dry but gives more definition, so re-dampen any section that dries before you reach it. Smooth the leave-in down with flat palms to help the strands clump, and stop when the section feels slippery and evenly hydrated with no dry, fluffy patches.
-
Smooth a few drops of light oil over the leave-in in each section to slow moisture loss. Then, as you reach each sub-section, apply a twisting cream or curl gel to clump the strands and give the twist its hold. Order matters because each layer does a different job. The cream or gel goes on last so its hold sits on the outside of the strand. Use less than you think, because too much product weighs twists down, reduces definition, slows drying and can leave flakes. On fine or low-density hair, use little or no oil and a light cream or foam, starting with about a pea-sized amount per twist. On coarse, high-density hair, a richer butter-based cream with a little gel on top gives the strands enough weight to stay defined. You’ve got the amount right when the hair looks coated and clumped, not greasy or white.
-
Within each section, part off a sub-section about 1 inch wide and split it into two equal halves. Wrap the halves over each other from root to tip with the same gentle tension all the way down. Even halves and even tension make the twist out uniform, because the pattern you see later is a print of the twist; a loose middle or lopsided split unravels into a limp or kinked piece. Never take hair from the other half to finish a twist. Those crossed strands get pulled apart when you unravel and stick up as frizz. Coil the last inch around your finger with a dab of extra cream or gel so the end stays sealed while it dries. Smaller twists give a tighter, more defined pattern and more pieces to separate, while larger twists give a looser, more stretched result.
-
Let the twists dry completely before you touch them. Ideally leave them overnight under a satin scarf or bonnet, or sit under a hooded dryer if you’re short on time. This is the step most twist outs fail on. Hair holds a new shape through hydrogen bonds that only re-form as the water leaves the strand, so opening a twist that is even slightly damp lets the pattern collapse into frizz. Thick twists and the crown dry last, so don’t judge by the hairline, which dries first. Do a test twist by opening one at the crown. If it feels cool, damp or limp in the center, retwist it and wait longer. You’re ready when the test twist is dry, firm and springs into a defined S-shape.
-
Once every twist is fully dry, rub a few drops of oil between your fingertips. Unravel each twist starting at the end and working up toward the root, following the path it was twisted. Starting at the end lets the two strands unwind along the same route they were wrapped, instead of being dragged against each other from the top, which snags and roughens the pattern. The oil on your fingers cuts friction, so the strands separate smoothly with less frizz. Unravel in the order you twisted, re-oiling your fingertips every few twists but never adding oil to the hair itself, until each twist has opened into two smooth, defined ropes.
-
Gently split each unraveled piece into two or three smaller pieces, pulling apart near the root so the parts between twists disappear. Then lift the roots with a pick. Separating builds fullness and fills the gaps your sub-sections left, while keeping each piece big enough to stay defined. Insert the pick at the scalp and lift outward only an inch or two. Picking or combing through the lengths breaks up the clumps you just set and turns definition into a frizzy halo. If your roots look puffy rather than full, you’ve picked too much or the twists were loose at the base, so use fewer passes and twist snugly from the very root next time. The finished shape should look full, with no visible parts and every clump still defined.
-
To keep the style from day two to day five, protect it every night and refresh it every morning. Before bed, gather your hair into a loose, high pineapple ponytail or retwist it into six to ten large twists, then cover it with a satin bonnet or scarf, or sleep on a satin pillowcase. Retwisting resets definition and helps most on tightly coiled (Type 4) hair. Cotton creates friction and absorbs moisture, and both turn texture into frizz overnight. In the morning, take your hair down, mist it lightly with water or diluted leave-in, smooth a little cream onto any frizzy pieces and pick only at the roots. When refreshing starts adding buildup instead of definition, it’s time for wash day.
Common Mistakes to Avoid
- Unraveling before every twist is completely dry. Any dampness, especially at the crown, collapses the pattern into frizz.
- Borrowing hair from the opposite strand to finish a twist, or splitting the halves unevenly. Both unravel into frizzy, lopsided pieces.
- Using too much product. It reduces definition, slows drying and can leave flakes, especially on fine hair.
- Picking or combing through the lengths instead of only at the roots, which breaks the defined clumps into a puff.
- Twisting tightly at the hairline. Heavy tension strains the edges, and gentle, even tension holds the pattern just as well.
- Sleeping on cotton without a bonnet, scarf or satin pillowcase, so friction frizzes the style overnight.
Pro Tip
If your ends are straighter or more damaged than the rest of your hair, set the end of each twist on a small perm rod or flexi rod (a twist and curl). That way the bottom of the twist out dries with the same curl as the top instead of hanging limp or frizzing.
Frequently Asked Questions
Should I do a twist out on wet or dry hair?
Damp hair gives the most definition because the twist sets as the hair dries. Slightly wetter hair defines even better but takes longer to dry. Twisting stretched, dry hair dries faster and gives a looser, fuller, less defined result. Either way, every twist must be completely dry before you unravel it.
Why is my twist out frizzy?
The most common cause is unraveling twists that weren't fully dry. Other causes are uneven halves, borrowing hair from the other strand, unraveling with dry fingers, picking through the lengths and sleeping on cotton. Oil your fingertips before unraveling, pick only at the roots, and protect the style with satin at night.
Why do my twists unravel or lose definition so fast?
Twists that come undone while drying usually have unsealed ends or a product with too little hold. Coil each end around your finger with a dab of gel or cream. Limp definition usually means too much product or twists that were too large. Ends that are heat-damaged or much straighter than the rest won't hold a twist, and a trim fixes that.
How long does a twist out last?
A twist out usually lasts three to five days. A nightly pineapple or large retwists under a satin bonnet keeps it defined, along with a light morning mist and a little cream. Humidity, heavy product and frequent touching shorten it. When refreshing adds buildup instead of definition, wash and start again.
How can I dry my twists faster?
Sit under a hooded dryer, or use a diffuser on damp twists, on low or medium heat, and work a heat protectant into the leave-in layer first. A common compromise is to dry under heat for part of the time and let the twists finish air-drying overnight. Always open a test twist at the crown before unraveling the rest.
You Might Also Like
- 20 edge-friendly two-strand twist hairstyles to inspire your next look
- shrinkage-smart French bob ideas for curly hair
- how to air dry hair without frizz
- how to diffuse curly hair for defined curls
- how to protect your hair while you sleep
- a cold-weather routine for dry hair
- scarf-friendly hairstyles, from silk head wraps to low buns
A defined, frizz-free twist out comes down to three habits: even twists that never borrow hair, a light hand with product, and the patience to let every twist dry completely before you open it. Get those right and protect the style with satin and a nightly pineapple or retwist, and one wash day can carry you to day four or five. When refreshing starts adding buildup instead of definition, wash and start again.
See a stylist who specializes in natural hair if your ends are too damaged to hold a twist, or if you want a cut shaped for your texture so your twist out falls evenly. If your edges are thinning, ease off the tension and talk to a dermatologist.
Sources
- Divide into large sections and part sub-sections about 1 inch wide. Split each sub-section evenly from root to end, and do not take hair from the other half to finish a twist, because this causes frizz. patternbeauty.com
- Part hair into 4 sections before applying product. Dry time is ideally overnight, and twisting on slightly wetter hair takes longer to dry but gives more definition. Too much product reduces definition and slows drying. mielleorganics.com